在研究 WFC 算法时(后来我觉得这个算法有点太言过其实了),发现了一个挺不错的 TilePainter Editor 脚本,用来做简单的关卡编辑器还不错,所以研究了一下。
地图是基于方形网格的,2D或者3D倒是无所谓。六边形网格的话需要进行一些修改。

光标和范围
首先是在地图的范围内绘制出光标的位置,当然其实不画也没什么关系。。。总之方便观察。 在地图范围生成碰撞体,在鼠标射线击中碰撞盒的位置画出十字。
类之前加上属性:
[RequireComponent(typeof(BoxCollider))]
这样加上这个编辑器脚本的同时也会加上碰撞盒。
碰撞盒的范围从设置的地图大小中读取:
void OnValidate()
{
	BoxCollider bounds = this.GetComponent<BoxCollider>();
	bounds.center = new Vector3((width * gridsize) * 0.5f - gridsize * 0.5f, 0f, (height * gridsize) * 0.5f - gridsize * 0.5f);
	bounds.size = new Vector3(width * gridsize, 0f, (height * gridsize));
}
加入定制的 editor 脚本,获取鼠标在 scene 视窗中的位置:
#if UNITY_EDITOR
[CustomEditor(typeof(MyTilePainter))]
public class MyTileLayerEditor : Editor
{
	private bool MouseHovering()
	{
		// 获取鼠标指针位置
	}

	void OnSceneGUI()
	{
		MouseHovering();
		if(Event.current.type == EventType.MouseMove)
			Event.current.Use();
	}
}
#endif
需要注意的是在鼠标移动后需要调用 Event.current.Use() ,不然等鼠标停下才会更新绘制。。。文档里这个函数的介绍有点敷衍,不是很明白为什么。
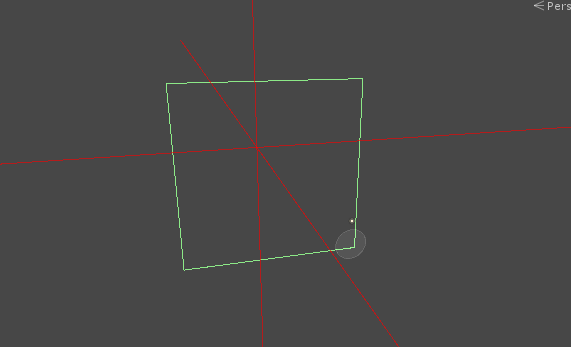
这时在 editor 中选中挂上代码的物体,然后在 scene 窗口中可以看到跟随鼠标移动的红色十字参考线。
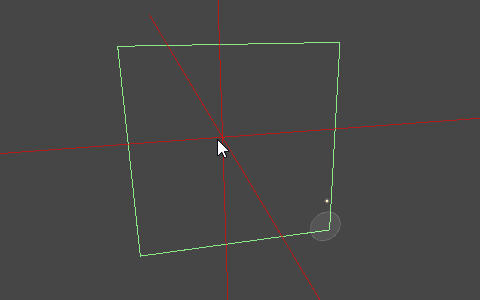
当然我们的关卡是基于 tile 的,所以光标的移动也应该在坐标点上:
public Vector3 GetGridPos(Vector3 pos)
{
    Vector3 p = pos + new Vector3(gridsize * 0.5f, gridsize * 0.5f, 0f);
    return new Vector3((int)(p.x / gridsize), (int)(p.y / gridsize), 0);
}
修改 MouseHovering 函数中的坐标计算:
me.cursor = me.GetGridPos(hit.point);
于是就有:
using UnityEngine;

#if UNITY_EDITOR
using UnityEditor;
#endif

[RequireComponent(typeof(BoxCollider))]
public class MyTilePainter : MonoBehaviour
{
	// 鼠标指针位置
	public Vector3 cursor;
	// 是否在 map 范围
	public bool focused = false;
	// map 属性
	public int gridsize = 1;
	public int width = 20;
	public int height = 20;
	public void OnDrawGizmos()
	{
		Gizmos.color = Color.white;
		// 红色线
		Gizmos.color = new Color(1f, 0f, 0f, 0.6f);
		Gizmos.DrawRay(cursor + Vector3.forward * -49999f, Vector3.forward * 99999f);
		Gizmos.DrawRay(cursor + Vector3.right * -49999f, Vector3.right * 99999f);
		Gizmos.DrawRay(cursor + Vector3.up * -49999f, Vector3.up * 99999f);
	}

	void OnValidate()
	{
		BoxCollider bounds = this.GetComponent<BoxCollider>();
		bounds.center = new Vector3((width * gridsize) * 0.5f - gridsize * 0.5f, 0f, (height * gridsize) * 0.5f - gridsize * 0.5f);
		bounds.size = new Vector3(width * gridsize, 0f, (height * gridsize));
	}

	public Vector3 GetGridPos(Vector3 pos)
	{
		Vector3 p = pos + new Vector3(gridsize * 0.5f, 0f, gridsize * 0.5f);
		return new Vector3((int)(p.x / gridsize), 0, (int)(p.z / gridsize));
	}

}

#if UNITY_EDITOR
[CustomEditor(typeof(MyTilePainter))]
public class MyTileLayerEditor : Editor
{
	private bool MouseHovering()
	{
		MyTilePainter me = (MyTilePainter)target;
		RaycastHit hit;

		if (Physics.Raycast(HandleUtility.GUIPointToWorldRay(Event.current.mousePosition), out hit, Mathf.Infinity) &&
		hit.collider.GetComponentInParent<MyTilePainter>() == me)
		{
			// me.cursor = hit.point;
			me.cursor = me.GetGridPos(hit.point);
			me.focused = true;
			return true;
		}

		me.focused = false;
		return false;
	}

	void OnSceneGUI()
	{
		MouseHovering();
		if(Event.current.type == EventType.MouseMove)
			Event.current.Use();
	}
}
#endif
采样和生成
获取鼠标的位置之后,选择需要绘制的块,然后绘制到光标的位置上。
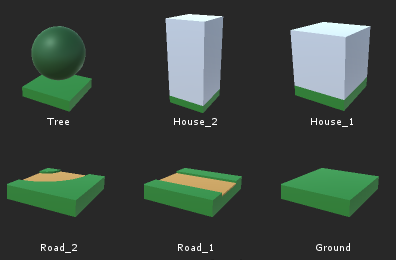
为了方便演示,在 SketchUp 里做了几个块导入到 Unity 中:
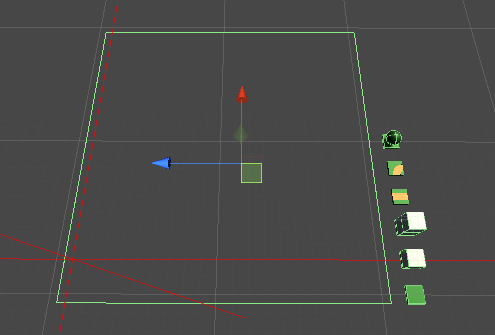
既然是编辑器,我们需要一个方便的选择方式。 新建 prefab 数组,赋值后,生成到地图的旁边:
Transform palt = transform.Find("palette");
if (palt != null) { GameObject.DestroyImmediate(palt.gameObject); }
GameObject pal = new GameObject("palette");

BoxCollider bc = pal.AddComponent<BoxCollider>();
bc.size = new Vector3(palette.Count * gridsize * 2, 0f, gridsize);
bc.center = new Vector3((palette.Count - 1f) * gridsize * 0.5f, 0f, 0f);

pal.transform.parent = this.gameObject.transform;
pal.transform.localPosition = new Vector3(0f, 0f, -gridsize * 2);
pal.transform.rotation = transform.rotation;

for (int i = 0; i < palette.Count; i++)
{
    UnityEngine.Object o = palette[i];
    if (o != null)
    {
        GameObject g = CreatePrefab(o, new Vector3(), transform.rotation);
        g.transform.parent = pal.transform;
        g.transform.localPosition = new Vector3(i * 2 * gridsize, 0f, 0f);
    }
}
可以设置 palette 的属性 pal.hideFlags = HideFlags.HideInHierarchy ,这样就不会在 scene 窗口中看见这个物体的碰撞盒,hierarchy 中也会隐藏。
按住S键点击采样模板块,点击和拖动则绘制模板块,
Editor 代码中加上下面代码,在 OnSceneGUI() 中执行:
public void ProcessEvents()
{
    MyTilePainter me = (MyTilePainter)target;
    int controlID = GUIUtility.GetControlID(1778, FocusType.Passive);
    EditorWindow currentWindow = EditorWindow.mouseOverWindow;
    if (currentWindow && MouseHovering())
    {
        Event current = Event.current;
        bool leftbutton = (current.button == 0);
        switch (current.type)
        {
            case EventType.KeyDown:
                if (current.keyCode == KeyCode.S) operation = TileOperation.Sampling;
                current.Use();
                return;
            case EventType.KeyUp:
                operation = TileOperation.None;
                current.Use();
                return;
            case EventType.MouseDown:
                if (leftbutton)
                {
                    if (operation == TileOperation.None)
                    {
                        operation = TileOperation.Drawing;
                    }
                    me.Drag(current.mousePosition, operation);
                    current.Use();
                    return;
                }
                break;
            case EventType.MouseDrag:
                if (leftbutton)
                {
                    if (operation != TileOperation.None)
                    {
                        me.Drag(current.mousePosition, operation);
                        current.Use();
                    }
                    return;
                }
                break;
            case EventType.MouseUp:
                if (leftbutton)
                {
                    operation = TileOperation.None;
                    current.Use();
                    return;
                }
                break;
            case EventType.MouseMove:
                me.Resize();
                current.Use();
                break;
            case EventType.Repaint:
                break;
            case EventType.Layout:
                HandleUtility.AddDefaultControl(controlID);
                break;
        }
    }
}
注意最后一个 HandleUtility.AddDefaultControl(controlID),如果没有这个的话,点击已经存在的块会跳转到那个块的 inspector 上去。
MyTilePainter 中加上:
public void Drag(Vector3 mouse, MyTileLayerEditor.TileOperation op)
{
    Resize();
    if (tileobs == null) { Restore(); }
    if (this.ValidCoords((int)cursor.x, (int)cursor.z))
    {
        if (op == MyTileLayerEditor.TileOperation.Sampling)
        {
            UnityEngine.Object s = PrefabUtility.GetPrefabParent(tileobs[(int)cursor.x, (int)cursor.z]);
            if (s != null)
            {
                sampleObj = s;
                sample_rotation = tileobs[(int)cursor.x, (int)cursor.z].transform.localRotation;
            }
        }
        else
        {
            DestroyImmediate(tileobs[(int)cursor.x, (int)cursor.z]);
            if (op == MyTileLayerEditor.TileOperation.Drawing)
            {
                if (sampleObj == null) { return; }
                GameObject o = CreatePrefab(sampleObj, new Vector3(), sample_rotation);
                o.transform.parent = tiles.transform;
                o.transform.localPosition = (cursor * gridsize);
                o.transform.localRotation = sample_rotation;
                tileobs[(int)cursor.x, (int)cursor.z] = o;
            }
        }
    }
    else
    {
        if (op == MyTileLayerEditor.TileOperation.Sampling)
        {
            int x = (int)(cursor.x) / 2;
            if (cursor.z == -1 && cursor.x >= 0 && x < palette.Count)
            {
                sampleObj = palette[x];
                sample_rotation = Quaternion.identity;
            }
        }
    }
}
还可以加上按住 X 键删除绘制:
参考代码来自下方链接中的下载文件,感谢作者: unity-wave-function-collapse github地址
后续
之后就可以把绘制好的地图保存成 json 之类的数据文件,对应的也可以加上读取和修改功能。
当然那就是另外一个故事了,这篇文章讲解简单的关卡编辑器的目的已经达到了。
参考资料
-
- riptutorial-editor 下面有个 MapEditor Sample,还挺不错的,好像是个插件来着