本文译自“Catlike Coding - Flow - Waves”
Catlike Coding系列是非常不错的入门系列教程,解释清晰配图充分,赞美作者。
注意
作者使用的是表面着色器,不过主要还是在顶点函数中修改。 注意原文中大部分向量是列向量,为了书写方便本文中以行向量形式书写。
1 正弦波
动态材质可以表现运动的表面,但是表面本身并没有移动。对于小的涟漪这样没问题,但不能表达大的波浪。在大面积的水体————湖泊或者海洋————风常常能制造出持续很长时间的浪。为了渲染这种风浪,我们使用正弦函数创建新的着色器,用来垂直移动网格面的顶点。
1.1 调整顶点
创建一个新的表面shader,命名为Waves。我们不会修改片段着色器方法,另外增加一个 vert 方法来调整顶点数据。这个方法有一个顶点参数,输入然后输出。我们就用Unity默认的顶点数据结构,appdate_full。
Shader "Custom/Waves" {
	Properties {
		_Color ("Color", Color) = (1,1,1,1)
		_MainTex ("Albedo (RGB)", 2D) = "white" {}
		_Glossiness ("Smoothness", Range(0,1)) = 0.5
		_Metallic ("Metallic", Range(0,1)) = 0.0
	}
	SubShader {
		Tags { "RenderType"="Opaque" }
		LOD 200

		CGPROGRAM
		#pragma surface surf Standard fullforwardshadows
		#pragma target 3.0

		sampler2D _MainTex;

		struct Input {
			float2 uv_MainTex;
		};

		half _Glossiness;
		half _Metallic;
		fixed4 _Color;

		// 新增加的顶点方法
		void vert(inout appdata_full vertexData) {}

		// 默认的表面着色器方法
		void surf (Input IN, inout SurfaceOutputStandard o) {
			fixed4 c = tex2D (_MainTex, IN.uv_MainTex) * _Color;
			o.Albedo = c.rgb;
			o.Metallic = _Metallic;
			o.Smoothness = _Glossiness;
			o.Alpha = c.a;
		}
		ENDCG
	}
	FallBack "Diffuse"
}
为了让表面着色器使用顶点方法,在 pragma 后面加上 vertex:vert
#pragma surface surf Standard fullforwardshadows vertex:vert
然后创建材质,创建plane,并赋值材质/shader等常规操作。
1.2 调整Y轴
先忽略z轴,每个顶点可以表达成 P = [x, y],P是最终的顶点位置,x/y则是原始顶点坐标,但是物体空间。使用简单的sin函数,于是我们有 P = [x, sin(x)] ,修改shader:
void vert(inout appdata_full vertexData)
{
	// 读取顶点
	float3 p = vertexData.vertex.xyz;
	// 控制顶点的y轴为x轴的sin函数
	p.y = sin(p.x);
	// 赋值顶点
	vertexData.vertex.xyz = p;
}
1.3 控制振幅
sin函数的取值范围是1,但我们不需要这个限制。在shader中增加一个属性a,让 P = [x, a * sin(x)],a就是振幅(amplitude):
Properties {
	…
	// 添加振幅属性
	_Amplitude ("Amplitude", Float) = 1
}
SubShader {

	half _Glossiness;
	half _Metallic;
	fixed4 _Color;
	float _Amplitude;

	void vert(inout appdata_full vertexData)
	{
		// 读取顶点
		float3 p = vertexData.vertex.xyz;
		// 通过_Amplitude修正y轴值
		p.y = _Amplitude * sin(p.x);
		// 赋值顶点
		vertexData.vertex.xyz = p;
	}
}
1.4 波长
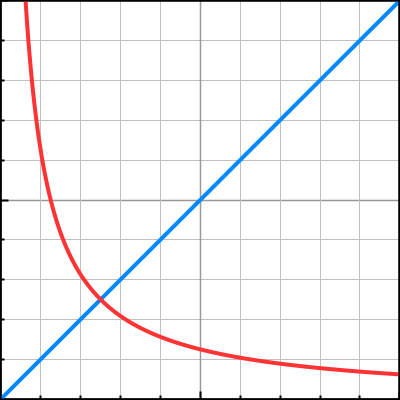
在sin函数中,波长是固定的2π。当然了,我们也要把波长参数化。最终我们会得到 Py = a * sin(2 * π * x / λ),λ是波长参数。我们也可以直接设参数 k = 2 * π / λ,这样就有Py = a * sin(k * x)。当然这样k参数和波长并不是线性相关,修改起来会有一点不直观,所以在教程中还是直接使用波长参数。
Shader "Custom/Waves" {
	Properties {
		…
		_Wavelength ("Wavelength", Float) = 10
	}
	SubShader {
		…
		float _Amplitude, _Wavelength;

		void vert(inout appdata_full vertexData) {
			float3 p = vertexData.vertex.xyz;
			// 使用波长计算参数k
			float k = 2 * UNITY_PI / _Wavelength;
			// 计算y轴偏移量
			p.y = _Amplitude * sin(k * p.x);
			vertexData.vertex.xyz = p;
		}
		…
	}
1.5 移动速度
波浪当然会移动,因此需要定义一个速度。使用相速度c最方便,相速度定义了整个波单位时间的移动量。使用时间偏移量 k * c * t,为了让波向正向移动,我们需要用 k * x 减去 k * c * t:
Properties {
	_Speed ("Speed", Float) = 1
}
SubShader {
	…
	float _Amplitude, _Wavelength, _Speed;

	void vert(inout appdata_full vertexData) {
		float3 p = vertexData.vertex.xyz;
		float k = 2 * UNITY_PI / _Wavelength;
		// 加入时间参数控制移动
		p.y = _Amplitude * sin(k * (p.x - _Speed * _Time.y));
		vertexData.vertex.xyz = p;
	}
	…
}
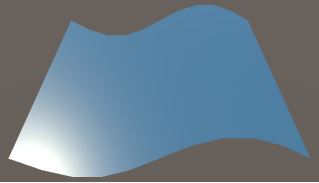
1.6 法向向量
现在我们的曲面有弯曲和移动,但是光照显示的还是平坦的平面。这是因为我们还没有改变顶点的法线。先不直接计算法向向量,我们来看看面的切向量T。对于原平面来说,T = [1, 0]。对我们的波面,我们则可以使用 $T = P’ = [x′, asin(k(x−ct))′]$ 。
sin函数的导数是cos函数,所以 $ sin’ x = cos x $。不过在我们的函数中sin是自变量。可以看作 $ P_{y} = asinf $,此时 $ f = k( x - ct )$。我们得用链式法则,$P_{y}’ = f’acosf $,而 $f’ = k$ ,所以我们有 $T = [1, kacosf]$。这个式子是有意义的,因为修改波长也会改变波的坡度。
为了得到最后的切向向量,我们还得标准化T。
当然我们的目的是得到法向向量。法向垂直于切向,所以我们用叉乘很容易得到结果。暂时我们的波浪在z轴上是不变的,次法线是单位向量可以被忽略,于是有 $N = [-kacosf, 1]$。
	float k = 2 * UNITY_PI / _Wavelength;
	float f = k * (p.x - _Speed * _Time.y);
	p.y = _Amplitude * sin(f);
	// 计算切向向量
	float3 tangent = normalize(float3(1, k * _Amplitude * cos(f), 0));
	float3 normal = float3(-tangent.y, tangent.x, 0);

	vertexData.vertex.xyz = p;
	vertexData.normal = normal;
1.7 网格面分辨率
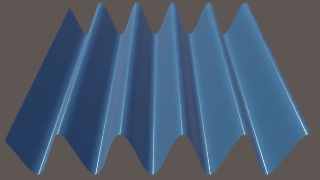
我们的波浪在浪宽为单位10的时候看起来还行,但是小浪宽的时候表现就很糟糕了。举个例子,浪宽为2的时候看起来就是立起来的锯齿形浪。浪宽为1的时候根本就没有浪(平板),取而代之的是整块板上下移动。其他的小浪宽会产生各种丑陋的浪甚至会向后移动。
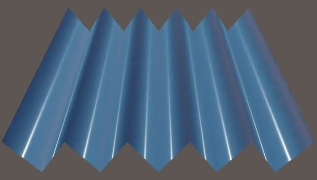
这个问题主要是我们平板的网格的分辨率造成的,简单的处理方法就是使用大的浪宽或者是增加网格的分辨率,要么直接使用另一个网格。
PS:我是直接使用了作者提供的高分辨率plane模型。至少我没找到怎么在unity中修改网格分辨率的方法,有知道的同学请不吝赐教,感谢。
1.8 阴影
虽然我们的表面看起来还不错,不过现在它还不能正确阴影交互。在投影和接受阴影的时候,还是和平板一样。
解决方案就是在surface pragma定义中添加addshadow,这会让Unity创建一个单独的阴影通道使用顶点函数的结果。
#pragma surface surf Standard fullforwardshadows vertex:vert addshadow
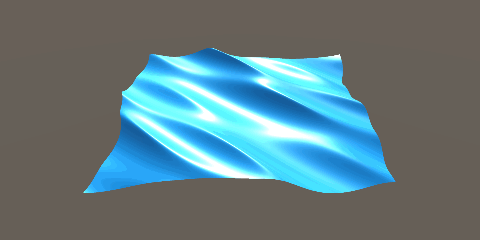
2 Gerstner波
最终Shader代码:
Shader "3DShader/Wave" {
	Properties
	{
		_Color ("Color", Color) = (1,1,1,1)
		_MainTex ("Albedo (RGB)", 2D) = "white" {}
		_Glossiness ("Smoothness", Range(0,1)) = 0.5
		_Metallic ("Metallic", Range(0,1)) = 0.0

		_WaveA ("Wave A (dir, steepness, wavelength)", Vector) = (1, 0, 0.5, 10)
		_WaveB ("Wave B", Vector) = (0, 1, 0.25, 20)
		_WaveC ("Wave C", Vector) = (1, 1, 0.15, 10)
	}
	SubShader {
		Tags { "RenderType"="Opaque" }
		LOD 200

		CGPROGRAM
		#pragma surface surf Standard fullforwardshadows vertex:vert addshadow
		#pragma target 3.0

		sampler2D _MainTex;

		struct Input {
			float2 uv_MainTex;
		};

		half _Glossiness;
		half _Metallic;
		fixed4 _Color;
		float _Steepness, _Wavelength;
		float2 _Direction;

		float4 _WaveA, _WaveB, _WaveC;

		float3 GerstnerWave(float4 wave, float3 p, inout float3 tangent, inout float3 binormal)
		{
			float steepness = wave.z;
			float wavelength = wave.w;
			float k = 2 * UNITY_PI / wavelength;
			float c = sqrt(9.8 / k);
			float2 d = normalize(wave.xy);
			float f = k * (dot(d, p.xz) - c * _Time.y);
			float a = steepness / k;

			tangent += float3( - d.x * d.x * (steepness * sin(f)), d.x * (steepness * cos(f)), -d.x * d.y * (steepness * sin(f)));
			binormal += float3( - d.x * d.y * (steepness * sin(f)), d.y * (steepness * cos(f)), -d.y * d.y * (steepness * sin(f)));

			return float3(d.x * (a * cos(f)), a * sin(f), d.y * (a * cos(f)));
		}

		void vert(inout appdata_full vertexData)
		{
			float3 gridPoint = vertexData.vertex.xyz;
			float3 tangent = float3(1,0,0);
			float3 binormal = float3(0,0,1);
			float3 p = gridPoint;
			p += GerstnerWave(_WaveA, gridPoint, tangent, binormal);
			p += GerstnerWave(_WaveB, gridPoint, tangent, binormal);
			p += GerstnerWave(_WaveC, gridPoint, tangent, binormal);

			float3 normal = normalize(cross(binormal, tangent));

			vertexData.vertex.xyz = p;
			vertexData.normal = normal;
		}

		void surf (Input IN, inout SurfaceOutputStandard o)
		{
			fixed4 c = tex2D (_MainTex, IN.uv_MainTex) * _Color;
			o.Albedo = c.rgb;
			o.Metallic = _Metallic;
			o.Smoothness = _Glossiness;
			o.Alpha = c.a;
		}

		ENDCG
	}
	FallBack "Diffuse"
}