书接上文。
Chapter 5:表面法线和多物体
首先我们了解一下表面法线来添加阴影。这是一个垂直于表面的向量,约定向外。一种设计准则是把这些法线都表达成单位向量(重申,这是约定的)。这是阴影的惯例所以我觉得这样也行,但是我不会在代码中强求。这会导致一些小bug,所以小心有很多这种类似的个人偏好。(PS:我觉得这里说的应该是如果不清楚别人有没有遵守这种约定,可能会导致bug)对于球体来说,法线向量是光线击中球体的点减去球心:
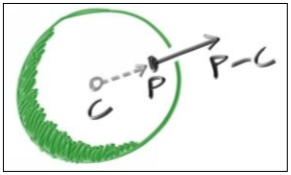
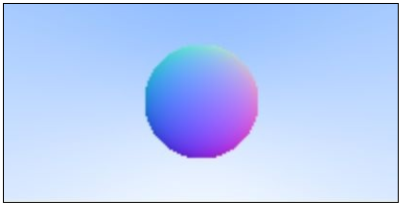
对地球上来说,这意味着法线向量从地心到你的位置,方向向上。我们先这个丢到代码里,加个阴影。现在我们还没有光线之类的,所以我们先用个彩色贴图来把法线可视化表现出来。一个用来法线可视化的常用的技巧(因为这个技巧非常简单并且直观的假定了N是单位长度的向量,每个坐标都在(-1,1)范围之间)是把所有的坐标都映射到(0,1)的范围内,然后把(x,y,z)当作(r,g,b)值(显示出来)。对于法线来说我们需要知道光线击中球体的点,而不仅仅是有没有击中。先假定最近的击中点(最小的t)。下面修改代码来计算兵可视化法线向量N:
float hit_sphere(const vec3& center, float radius, const ray& r)
{
    vec3 oc = r.origin() - center;
    float a = dot(r.direction(), r.direction());
    float b = 2.0 * dot(oc, r.direction());
    float c = dot(oc, oc) - radius * radius;
    float discriminant = b*b - 4 * a*c;
    if (discriminant < 0)
        return -1.0;
    else
        return(-b - sqrt(discriminant)) / (2.0*a);
        //return (discriminant > 0);
}

vec3 color(const ray& r)
{
    float t = hit_sphere(vec3(0, 0, -1), 0.5, r);
    if (t > 0.0)
    {
        vec3 N = unit_vector(r.point_at_parameter(t) - vec3(0, 0, -1));
        return 0.5*vec3(N.x() + 1, N.y() + 1, N.z() + 1);
    }
    /*if (hit_sphere(vec3(0, 0, -1.0), 0.5, r))
        return vec3(1.0, 0, 0);*/

    vec3 unit_direction = unit_vector(r.direction());
    t = 0.5*(unit_direction.y() + 1.0);
    return (1.0 - t)*vec3(1.0, 1.0, 1.0) + t*vec3(0.5, 0.7, 1.0);
}
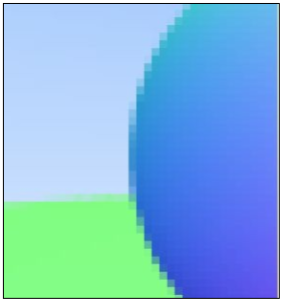
生成图片:
现在,再加几个球怎么样?增加一系列的球是很诱人的事,一个清晰的解决方案就是写一个抽象类来针对所有可能被光线击中的东西,然后就可以把一个球或者很多球都变成这个东西。这个类该叫什么是挺令人困惑的————“对象”是个好名字,如果没有面向对象编程的话。有些人常常用“表面”这个词,缺点是会让人想起体积。“可击中的(Hitable)”暗示了统一的成员方法。其实我都不喜欢这些,不过就用“Hitable”好了。
这种可击中的抽象类型将有一个击中的方法考虑击中的方法。大部分的光线追踪器都认为给击中的范围加入一个有效区间是很合适的,所以发生在 tmin< t < tmax 范围内才算数。对于之前的光线来说正数的t就好了,但就像我们能看到的,把限定一个区间(tmin,tmax)可以在一些细节上帮助我们。一个设计问题是是否(ps:为什么是whether不是what)要做点像计算法线的事,在只要击中点什么的时候,又或者当我们击中了最近的东西就停止计算击中,这样只需要计算最近的东西的法线。我会使用最简单的解决方案,计算一系列保存在某个结构中的东西。我知道我们在某个阶段会需要动态模糊,所以我们需要增加一个输入的参数。下面是抽象类:
#ifndef HITABLE
#define HITABLE
#include "ray.h"

struct hit_record
{
    float t;
    vec3 p;
    vec3 normal;
};

class hitable
{
    public:
        virtual bool hit(const ray& r, float t_min, float t_max, hit_record& rec) const = 0;
};
#endif
这里是球类(提醒一下我消除了一些重复的2)
PS:这个include本来是放在#ifndef后面的,但是居然报错不能放在宏定义内部。。。之前写的时候也没有报错啊,没搞懂, PSS:重新建了一个项目后就好了。。。
#include "hitable.h"
#ifndef SPHEREH
#define SPHEREH

class sphere: public hitable
{
    public:
        sphere(){}
        sphere(vec3 cen, float r) : center(cen), radius(r) {};
        virtual bool hit(const ray& r, float tmin, float tmax, hit_record& rec) const;
        vec3 center;
        float radius;
};

bool sphere::hit(const ray& r, float t_min, float t_max, hit_record& rec) const
{
    vec3 oc = r.origin() - center;
    float a = dot(r.direction(), r.direction());
    float b = dot(oc, r.direction());
    float c = dot(oc, oc) - radius * radius;
    // 因为其实:float b = 2.0 * dot(oc, r.direction());
    // 两边除掉4,就得到下面的函数
    float discriminant = b*b - a*c;
    if (discriminant > 0)
    {
        float temp = (-b - sqrt(b*b - a*c)) / a;
        if (temp < t_max && temp > t_min)
        {
            rec.t = temp;
            rec.p = r.point_at_parameter(rec.t);
            rec.normal = (rec.p - center) / radius;
            return true;
        }
        temp = (-b + sqrt(b*b - a*c)) / a;
        if (temp < t_max && temp > t_min)
        {
            rec.t = temp;
            rec.p = r.point_at_parameter(rec.t);
            rec.normal = (rec.p - center) / radius;
            return true;
        }
    }
    return false;
}
#endif
然后是一系列物体:
#ifndef HITABLELISTH
#define HITABLELISTH

#include "hitable.h"

class hitable_list :public hitable
{
    public:
        hitable_list(){}
        hitable_list(hitable **l, int n) { list = l; list_size = n; }
        virtual bool hit(const ray& r, float tmin, float tmax, hit_record& rec) const;
        hitable **list;
        int list_size;
};

bool hitable_list::hit(const ray& r, float t_min, float t_max, hit_record& rec) const
{
    hit_record temp_rec;
    bool hit_anything = false;
    double closest_so_far = t_max;
    for (int i = 0; i < list_size; i++)
    {
        if (list[i]->hit(r, t_min, closest_so_far, temp_rec)) {
            hit_anything = true;
            closest_so_far = temp_rec.t;
            rec = temp_rec;
        }
    }
    return hit_anything;
}
#endif
修改main函数:
#include <iostream>
#include <fstream>
#include "vec3.h"
#include "float.h"
#include "sphere.h"
#include "ray.h"
#include "hitablelist.h"

using namespace std;

vec3 color(const ray& r, hitable *world)
{
    hit_record rec;
    // PS:这里原文用的是MAXFLOAT,但是找不到,所以参考修改成下面
    // PS:或者用FLT_MAX也行
    if (world->hit(r, 0.0, (numeric_limits<float>::max)(), rec))
    {
        return 0.5*vec3(rec.normal.x() + 1, rec.normal.y() + 1, rec.normal.z() + 1);
    }
    else
    {
        vec3 unit_direction = unit_vector(r.direction());
        float t = 0.5*(unit_direction.y() + 1.0);
        return (1.0 - t)*vec3(1.0, 1.0, 1.0) + t*vec3(0.5, 0.7, 1.0);
    }
}

int main()
{
    ofstream outfile("chapter5_hitable_list.ppm", ios_base::out);

    int nx = 200;
    int ny = 100;
    outfile << "P3\n" << nx << " " << ny << "\n255\n";

    vec3 lower_left_corner(-2.0, -1.0, -1.0);
    vec3 horizontal(4.0, 0.0, 0.0);
    vec3 vertical(0.0, 2.0, 0.0);
    vec3 origin(0.0, 0.0, 0.0);

    hitable *list[2];
    list[0] = new sphere(vec3(0, 0, -1), 0.5);
    list[1] = new sphere(vec3(0, -100.5, -1), 100);
    hitable *world = new hitable_list(list, 2);

    for (int i = ny - 1; i >= 0; i--)
    {
        for (int j = 0; j < nx; j++)
        {
            float u = float(j) / float(nx);
            float v = float(i) / float(ny);
            ray r(origin, lower_left_corner + u*horizontal + v*vertical);
            vec3 p = r.point_at_parameter(2.0);
            vec3 col = color(r, world);

            int ir = int(255.99 * col[0]);
            int ig = int(255.99 * col[1]);
            int ib = int(255.99 * col[2]);

            outfile << ir << " " << ig << " " << ib << "\n";
        }
    }
    return 0;
}
Chapter 6:抗锯齿
当真正的相机拍照的时候,是不会有“狗牙”在物体的边缘的,这是因为边缘的像素实际上混合了一些前景(应该是指物体)和一些背景。我们用在每个像素内混合采样的方式应该也能够达到相同的想过。我们不要为“startification”烦恼(PS:这个单词翻译出来是成层的意思。。。不明白啥意思),虽然有点争议,但对我的程序来说是正常的。对一些光追器来说这是个瑕疵,不过对于通常的(光追器)来说,就像我们写的这个,并不能(在修改这点上)获得太多好处,还会把代码变丑。我们待会把相机类抽象一点,做一个更酷的出来。
我们要做一个随机数生成器,那种可以生成真随机数的(并不是很确定他指的真随机数是什么)。C++并不像传统的那样提供了一个标准的随机数生成器,不过对于大部分系统来说都有一个drand48()的函数藏在了某处,这是我这里要用的。然而新版的C++用
对于给定的像素来说,我们在这个像素内可以有几个采样点,光线会通过这些采样点。这些光线的颜色会取平均值:
把这些放在一起生成一个相机类来封装我们的简单的平行于轴的相机:
#ifndef CAMERAH
#define CAMERAH

#include "ray.h"

class camera
{
public:
    camera() {
        lower_left_corner = vec3(-2.0, -1.0, -1.0);
        horizontal = vec3(4.0, 0.0, 0.0);
        vertical = vec3(0.0, 2.0, 0.0);
        origin = vec3(0.0, 0.0, 0.0);
    }
    ray get_ray(float u, float v){
        return ray(origin, lower_left_corner + u*horizontal + v*vertical - origin);}

    vec3 origin;
    vec3 lower_left_corner;
    vec3 horizontal;
    vec3 vertical;
};
#endif
修改Main(因为相机的函数已经抽象出去了):
#include <iostream>
#include <fstream>
#include "vec3.h"
#include "sphere.h"
#include "ray.h"
#include "camera.h"
#include "hitablelist.h"

using namespace std;

vec3 color(const ray& r, hitable *world)
{
    hit_record rec;
    if (world->hit(r, 0.0, FLT_MAX, rec)) {
        return 0.5*vec3(rec.normal.x() + 1, rec.normal.y() + 1, rec.normal.z() + 1);
    }
    else {
        vec3 unit_direction = unit_vector(r.direction());
        float t = 0.5*(unit_direction.y() + 1.0);
        return (1.0 - t)*vec3(1.0, 1.0, 1.0) + t*vec3(0.5, 0.7, 1.0);
    }
}

int main()
{
    ofstream outfile("output/06_antialiasing.ppm", ios_base::out);

    int nx = 200;
    int ny = 100;
    int ns = 100;
    outfile << "P3\n" << nx << " " << ny << "\n255\n";

    hitable *list[2];
    list[0] = new sphere(vec3(0, 0, -1), 0.5);
    list[1] = new sphere(vec3(0, -100.5, -1), 100);
    hitable *world = new hitable_list(list, 2);
    camera cam;

    for (int i = ny - 1; i >= 0; i--)
    {
        for (int j = 0; j < nx; j++)
        {
            vec3 col(0, 0, 0);
            for (int s = 0; s < ns; s++)
            {
                float u = float(j + rand() / double(RAND_MAX)) / float(nx);
                float v = float(i + rand() / double(RAND_MAX)) / float(ny);
                ray r = cam.get_ray(u, v);
                vec3 p = r.point_at_parameter(2.0);
                col += color(r, world);
            }
            col /= float(ns);
            int ir = int(255.99 * col[0]);
            int ig = int(255.99 * col[1]);
            int ib = int(255.99 * col[2]);

            outfile << ir << " " << ig << " " << ib << "\n";
        }
    }
    return 0;
}
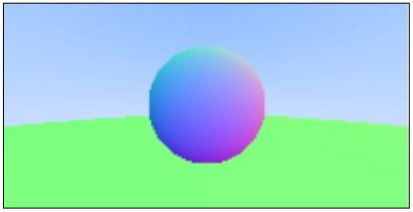
可以看到边缘的部分不再像一直有锯齿了,显示出不同的透明度渐变效果。输出:
未完待续。